Welcome


These are tried, tested and much loved recipes. Our families and friends are always unselfish and devote themselves to taste-testing these delicious creations and demand them repeatedly time and time again.

Our aim is to share with you our favourite meals and the little tricks and tips we have learnt along the way.
Time is precious.
Food is expensive.

Both are resources too valuable to waste.

We want to share recipes that deliver delicious, nourishing meals - making the most of your time and ingredients.

Life is way too short for bland, disappointing food.
So ... Feed your inner cook - and Enjoy!

Thursday 29 December 2016

Indian cashew rice


Perfect at this time of year to have a dish with no turkey or ham!! A great accompaniment to a curry feast, the cashews and spice give great depth of flavour.

Ingredients

200g Basmati rice
2 tbsp Oil
1 onion finely sliced
1 teaspoon garam masala
1/2 teaspoon mustard seeds
1/2 teaspoon tumeric
1 teaspoon cumin seeds
2 tablespoons roasted salted cashews
Coriander, chopped
Pinch of salt
Lemon juice

Method

Heat oil in a frypan, add mustard and cumin seeds and cook for 30 seconds until fragrant.
Add sliced onion and saute until soft (approx 6 minutes).
Add garam masala and tumeric and salt, stir for 20 seconds.
Add rice and 375 ml of water, bring to the boil then cover and cook on the lowest heat for 10 minutes.
Check that the grains are tender, if not leave for another 2 minutes to steam.
Remove lid and allow any moisture to evaporate.
Tip onto a serving platter and top with cashews and coriander.

Mamma Marmalde

Thursday 22 December 2016

Season's Greetings for a Happy Christmas and New Year

Christmas is a time to reflect, appreciate life, cherish loved ones and remember those who have touched our lives. 
May you have food to share, good company, merriment, silliness and good health in abundance.  
Thank you for supporting our recipe sharing journey and we look forward to adding to our collection in 2017.  
Happy Christmas and New Year.                     Enjoy!  Colleen and Mama Marmalade

 
Feed Your Inner Cook:  Candle 


Feed Your Inner Cook : GOMA Brisbane collection


Feed Your Inner Cook.  Emerson

Feed Your Inner Cook : Christmas

Thursday 15 December 2016

Summer Rice Salad


Summer is the season of salads.  A splash of lime juice, soy and coriander add a burst of fresh flavours to that mainstay rice salad.  I like using a Low GI rice and adding lots of fresh vegetables - you can add your favourite veggies and change the dressing for variety.  Easy, make-ahead and assemble before serving!  Enjoy!  
Summer Rice Salad by Feed Your Inner Cook
Preparation and Cooking
approx 20 minutes to prepare, cook rice and refrigerate
minimum 1 hour for rice to cook  (preferably use the next day) 
approx 15 minutes to chop and cook vegetables
approx 5 minutes to mix dressing and assemble.

Ingredients
1 - 2 cups rice - cooked per packet directions.  (I use 2 cups)
I wash it well first and use the absorption method to cook.  Then scatter over teatowel lined baking trays and refrigerate for approx 15 minutes to cool and dry a little.  Then store in an airtight container.  Use as much rice as you need for your salad. I use most of it and freeze any remaining rice in freezerproof container and freeze for later.

plus
A splash rice bran oil
and 
this is a rough guide - vary to your preference, add more or different veggies

1 red onion finely diced
crushed garlic
1/2 red capsicum - diced
1 zucchini - diced
1 cup peas and corn - slightly defrosted
1/2 red chilli finely sliced   OR  good shake of dried chilli flakes
2 stalks celery - finely sliced  - also the soft leaves if possible
2 shallots - shredded excluding the roots and the tough upper green edges
1/2 bunch coriander - roughly chopped
1/2 bag of Bean Sprouts  - I like to chop these in half
handful snow peas - destringed and sliced


Dressing
1 tablespoon Fish Sauce
2 tablespoons Lime Juice  (you might need more depending on strength of flavour)
1 tablespoon Soy Sauce
1 teaspoon Sesame Oil
shake dried chilli flakes
2 teaspoons brown sugar
optional (depending on flavour)
1 - 2 tablespoons Ponzu dressing
shake white pepper
a little finely chopped lemongrass

Method

Cook then cool your rice as detailed above.

Prepare the dressing - use either a deep jug or bottle with a tight lid.
Combine well.
Taste.  Adjust as needed to your preference.  

Veggies
Heat a little rice bran oil in a wide frypan.
Add the onion and soften.
Add the garlic, capsicum, zucchini, peas, corn and chilli flakes cooking until begins to soften slightly
Add celery and stir through.  
Remove from heat and cool slightly.
Stir through the shallots, coriander, bean sprouts and snow peas until combined.

Assembly
Gently toss the slightly cooled vegetables through the rice.
Add the dressing - a little at a time
 - you probably WON'T use all the dressing (refrigerate any remaining dressing and use later in the week)

Serve   OR  if preparing ahead you could add the dressing just before serving. It tastes great either way and the rice holds the flavours really well.
                                                Enjoy!   Colleen


Thursday 8 December 2016

Cherry Coconut Banana cake

The flavours of these ingredients combine for a fresh coconut variation on a Banana bread favourite.
In summer, bananas always seem to over-ripen before the family can eat them. So I pop them – whole, in their skin – in a freezer bag and always have a few in the freezer ready for lots of recipes. 
I love making Banana loaf but unlike many banana bread recipes, the flavour of bananas does not dominate this cake.  It is so coconutty – you can still taste the bananas but the coconut, almonds and cherries really give it a freshness and difference. A great flavour change and lasts for a few days in an airtight container.  I regularly cook some cake batter in a mini loaf tin so I can pop it in the freezer and always have something homemade ready for visitors along with a cup a tea.   Enjoy!


Preparation      15 minutes
Cooking             approx. 25 min for mini loaf tin.  Approx 60 min for 23 cm loaf tin
Makes                23cm loaf tin and a 15 cm small loaf tin

Ingredients
4 medium bananas – mashed in a large bowl
125 gram butter – melted and cooled slightly
150 gram sugar
2 eggs – lightly beaten
175 gram Plain Flour 
2 teaspoons Baking Powder
½ teaspoon Bicarb of Soda
Tiny pinch of Salt
100 gram dried cherries – halved
60 – 80 gram frozen cherries – halved
100 gram desiccated coconut
½ teaspoon good quality coconut extract (if not available – omit)
50 – 60 gram Flaked Almonds
Handful Shredded coconut – for scattering over top of cake

Method
Preheat oven to 170˚ Celsius
Line loaf tins with baking paper

Mash the bananas well in a large bowl.
Add the sugar and mix in until begins to dissolve
Mix the melted butter through the sugar banana mash
Then fold the beaten eggs through the mixture
Sift the flour, baking powder, Bicarb and salt into the mixture and gently fold through until combined.
Stir in the coconut, extract, almond and cherries. Fold through very gently until combined.  Do not overwork the flour or the cake will be tough. Just so no lumps of dry flour visible.
Pour into the prepared tins.
Scatter the Shredded coconut over the top and gently pat into the top of batter,

Bake the mini loaf approx. 25 – 35 minutes (check regularly from 25 minutes)
Bake the 23 cm loaf tin approx. 50 – 60 minutes (check regularly from 45 minutes)
Check by inserting a skewer into middle of cake until comes out clean.
Cake should be formed and golden on top
Remove from oven and leave to cool in the pan on a cake rack.
When cool remove cakes from pan.
Wrap the mini loaf tightly in clingwrap and place in a plastic freezer bag removing as much air as possible.
The larger loaf cake keeps well in an airtight container for a few days.


                             Enjoy!  Colleen

Wednesday 30 November 2016

Pina Colada Ice Cream

The first day of summer demands a summery treat!
We have had so many enquiries about this fabulous tropical ice-cream - so here it is!

Perhaps you don’t like getting caught in the rain … or singing dodgy songs from the 70’s.  But my super-easy version of Nigella’s no-churn recipe will definitely have you ...  smiling - and singing – any time of the day.

  
I included macadamias, coconut and crushed meringues to help reduce the cream overload per spoonful  – and I also used the lime zest to really add a zing and gorgeous flecks of bright green to the coconut ice-cream -  intensifies those pine-lime summery memories.  This is definitely Adults Only.


This is obviously very rich and creamy – so - I freeze mine in numerous very small freezer proof containers and hide them throughout the freezer (much to Wilbur’s frustration).   You only need to serve a mini portion per person for a really satisfying tropical escape! 


Preparation    15 minutes
Freezing          4 hours minimum.     Best used that week but okay to keep frozen for 1 month, well covered.

The inclusion of the nuts etc helps make this about 1 litre or so, which converts to 8 x 125ml (1/2 cup) serves, so smaller serves are definitely recommended and would go much further -  plus - you have the option of serving it with a tropical fruit platter to extend it even further as well.

Ingredients

600 ml   thickened cream 
Handful  macadamias – finely chopped (but not chopped to dust),  then lightly toasted
Good pinch of   shredded coconut – lightly toasted   (can do more and reserve for presentation if desired)
125 ml   pineapple juice – good Aussie carton brand is fine
80 ml    Mailbu  (white coconut rum)  or the cheaper version is fine too
Few drops   Natural Coconut essence   (Plus  -  may need to add a drop more at the end)
Zest of  1 lime   – very finely zested
3 teaspoons   lime juice   (Plus  -  may need to add a drop more at the end)
50  -  75 gram   icing sugar  - sifted   
(start with 50 gram – the meringues also add a sugary hit. You can add a little more at end if you want)
90 gram   mini meringue nests – very finely crushed.  

Method

Toasting -  in a small non-stick pan, lightly toast the chopped nuts. Remove and allow to cool.  
Repeat with the shredded coconut  separately –  remain at the stove and stir well, only takes a couple of minutes.  Both will catch and overbrown quickly, if not watched.

In a jug (helps for pouring later) mix the juice, rum, essence, lime juice and zest.
Whisk in the sifted icing sugar (50 gram to start) and mix well to combine.

Using a stand mixer or hand-beater and a large bowl  –  whisk the thickened cream until soft peaks form.

Whisking gently – add the jug of juice mixture gradually.  Do not over-whisk.

Gently fold in   (don’t whisk)   the coconut, macadamias and crushed meringues.  Stir gently.

Taste and check it has a good coconutty / lime / sugar / creamy balance.  Adjust if needed and just stir through.

Pour into airtight, freezer-proof containers with tight  fitting lids.
Freeze minimum 4 hours.         

                                                        Enjoy!   Colleen                 

Thursday 24 November 2016

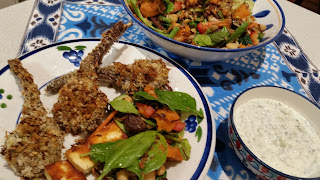
Haloumi Panko Crumbed Lamb Cutlets with Salad

Lamb cutlets! Lamb Lollipops!  
Whatever your family calls them they are delicious and so versatile .. endless flavour options .. and one of Wilbur's favourites however they are cooked! Enjoy!


Serves                  4.     I allow 2 cutlets per person but Wilbur suggests 4 for him!
Preparation          10 minutes plus prepare salad whilst cutlets baking
Cooking               25 minutes for cutlets.  
                            Additional 10 - 20 minutes to warm veggies, fry off crumbs and cook                                           optional haloumi pieces

Ingredients
8 lamb cutlets – trimmed of extra fatty fat
1/3 cup Panko Breadcrumbs  OR    you could crumb 3 slices fresh bread
1 teaspoon ground oregano  OR dried oregano leaves
1 teaspoon dried Mint
Shake of celery seeds (optional)
Freshly ground pepper to your taste
Tiny pinch sea salt (optional – Haloumi is salty)
1/2 cup Grated Haloumi  Approx 80 gram.
Extra haloumi cut into thick slices for frying  - Optional extra
1 egg – whisked
Splash Olive Oil

Tzatziki
½ cucumber, grated and remove the liquid by squeezing out well
1/3 cup Greek yoghurt
1 clove garlic – crushed
1 tablespoon lemon juice
Fresh dill – chopped  OR  fresh mint

Method
Preheat the oven to 180˚ C
Using 2 plates with a lip – put the whisked egg onto one plate
On the other plate, lightly combine the breadcrumbs, haloumi, herbs, salt and pepper.
Have an oven tray with a narrow lip ready and lined with baking paper.
Use one hand to dip the cutlet into the egg.  Then use the other hand to toss gently in the crumb mix and place on tray.  When all cutlets are crumbed gently pat the crumbs onto the top. 
The remaining crumb mix is excellent to quickly fry off in a pan, allow to cool and sprinkle over salad.
Drizzle the tiniest amount of olive oil over the cutlets.  Or a spray bottle works well.
Bake for approx. 20 - 25 minutes until golden.

Whilst the cutlets are baking
Prepare the Tzatziki by combining ingredients in a small bowl.
Just before serving the cutlets:  fry off the extra haloumi slices for an extra cheesy addition.

Salad
I like to serve a mixture of warm sweet potato pieces, sliced green beans, fried onion slices, lots of various lettuce greens, baby spinach leaves, black olives, tomatoes, sliced cucumber combined with cannellini beans and fresh mint or parsley.   Whatever you would like to combine for a delicious salad to serve with the Tzatziki and cutlets will be delicious.
                            Enjoy!   Colleen

Wednesday 16 November 2016

Pastitsio

This is a great family comfort food favourite.  The flavours of the tomatoes, spices and lamb work so well with the pasta - and so filling ! Just serve with salad or steamed greens for a satisfying family dinner.  As I am preparing the meal, I pop about 1/3 into a smaller dish to freeze for another time.  See below for easy freezing instructions!  Enjoy!


Preparation          20 minutes (while pasta is cooking)
Cooking                40 min plus approx 30 -40 min in oven 
Serves                  6 - 8 depending on appetite.  

Ingredients

250 - 300 grams Macaroni – cooked per packet directions then drained

500 gram Lamb Mince
Splash Olive Oil
2 onions – finely chopped
2 garlic cloves – crushed
½ teaspoon Dried Red Chilli   OR  ½ chopped Red chilli
½ teaspoon Fennel Seeds
2 Zucchini – diced
6 mushrooms – sliced
2 tablespoons Tomato Paste
700 ml Passata
1 teaspoon Dried Oregano
1 teaspoon Dried Basil
½ teaspoon Ground Cinnamon
Salt and Pepper to taste (unlikely to need the salt)
Sprinkle of freshly grated Nutmeg  OR   1/4 teaspoon Ground Nutmeg
2 handfuls Rocket  OR  Baby Spinach  and/or  Kale -  chop the greens roughly before adding
Handful Fresh basil leaves

60 gram butter
1/3 cup Plain Flour – sifted
2 ½ - 3 cups Milk
1 cup cheddar cheese – grated
¼ cup Grated Parmesan cheese
Sprinkle freshly grated Nutmeg or shake ground Nutmeg
1 egg – whisked

Method
Cook the pasta according to packet directions.  Then drain and reserve a little of the cooking water.
Reuse the saucepan later to make the cheese sauce

Preheat oven to 180˚C
Grease a generous sized lasagne dish.  OR  2 smaller dishes

Heat a little oil in a large wide frypan.
Add the onion, garlic and zucchini and stir until begins to soften.
Add the mince and brown.  Break up any lumps.
Stir through the tomato paste and mix well and cook for a few minutes.
Add the Passata, fennel seeds, chilli, mushrooms, herbs and spices
Reduce heat and simmer until sauce is thick and aromatic.
Stir in the greens.  Taste and add pepper if needed.
When pasta is cooked, drain and add to the meat sauce pan. Reserve some pasta water for later.
If the mixture becomes too thick and dry, add a splash of pasta water to loosen a little.
Add the basil leaves just before pouring into baking dish.

Whilst the meat and pasta mixture is on a very low simmer:

Re-using the saucepan:
Melt the butter over a low-medium heat.  Do not burn.
Sprinkle in the flour and constantly whisk to combine. Take off the heat and return to heat to avoid burning if heating too quickly.
Cook for at least 1 minute until bubbly and raw flour ‘cooks out’.
Slowly add the milk whisking all the time to thoroughly combine.
Continue slowly whisking until mixture comes to a boil and thickens.
Simmer for 2 minutes, whisking all the time so it does not catch on base of pan
Remove from heat.
Stir through half of the grated cheese and all the parmesan
Allow the mixture to cool for ten minutes.
Sprinkle with a dash of nutmeg
Gently whisk in the beaten egg.  Keep it moving to prevent egg cooking.

Place the meat mixture over base of lasagne dish and smooth the top.
Spoon the cheese sauce gently over the meat mixture.
Sprinkle remained grated cheese over top.
Bake for approx. 20 – 30 minutes.  Check after 15 minutes and cook until topping is golden.
Serve with salad or steamed greens of your choice.
To FREEZE 
ladle (about 1/3) into a separate container. Pour over some of the sauce and cheese but do not cook the top.  Defrost in the fridge at least overnight.  Allow about 15 minutes or so out of the fridge before popping into the oven.Heat the oven 180C and bake about 30 - 40 minutes or so depending on the size of the dish.  If top is cooking too quickly, tent a piece of alfoil above the topping without touching the topping and cook.

                                 Enjoy!  Colleen

Tuesday 8 November 2016

Profiteroles

These Profiteroles are easier than you think.  My sister Kathy makes these for my husband's birthday every year.  It's become a family tradition.  That's the wonderful thing with cooking and sharing with family and friends - the memories and traditions that are created.


Ingredients

1 cup water
75g unsalted butter
1 cup of plain flour
pinch of salt
4 eggs

Whipped cream for filling

Chocolate Sauce
Melt equal amounts of good quality dark chocolate and cream in a bowl over a saucepan of simmering water.

Method

Preheat oven to 200 degrees Celsius

Place water and butter in a saucepan over a low heat until butter melts. Bring to the boil (it is important for the mixture to boil).
Add sifted flour and salt, stir with a wooden spoon until mixture forms a ball and leaves the side of the pan.
Remove from the heat immediately, let mixture cool slightly.

Place mixture into a small bowl of an elctric mixer or even a food processor. Turn onto low speed and add eggs one at time, beating well between each egg.
Mixture should be very thick, smooth and glossy. You may need to stop the mixing to scrape down the sides and beaters.

Grease oven trays.
Drop rounded tablespoons of mixture onto tray.
Bake for 10 minutes in a hot oven, (200 degrees Celsius) reduce heat to moderat (180 degrees Celsius) cook for a further 40 minutes or until puffs are golden and firm to touch.
When cooked remove from oven, make a small slit in the side of each puff for steam to escape: return to oven for  a few minutes to dry out.

When puffs are cold cut in half and fill with whipped cream, place back together.
Once plated drizzle over chocolate sauce.

Superb !!
Mama Marmalade


Wednesday 2 November 2016

Turmeric Tomato Chilli Chicken

It’s great to have a few quick toss together recipes that incorporate lots of veggies and delicious flavours.  Chicken Mince is such a versatile stand-by and soaks up the Asian flavours of ginger, turmeric, soy and fish sauce. You can make it quite spicy if you like by increasing the amount of chilli.  The amount of chilli I use is more on the mild side but still delivers a touch of warm and flavour. Enjoy!

Preparation       15 minutes  - Have everything chopped and ready to go!
Cooking            10 minutes
Serves               4 -5
Ingredients
500 gram Chicken Mince
Splash of Rice Bran Oil  OR   vegetable oil

15 cm piece ginger peeled and shredded finely  – 10 cm for fried garnish and 5 cm for meal
TIP:  don’t worry about the garnish if pressed for time, just use a bit extra ginger during cooking

1 onion finely sliced
2 garlic cloves – crushed
2 tablespoons Tomato Paste
1 teaspoon ground Turmeric
½ red chilli – sliced  OR   ½ teaspoon chilli flakes
½ red capsicum sliced
2 kaffir lime leaves – remove vein and shred very very finely
2 stalks celery – sliced
2 tablespoons Fish Sauce
1 tablespoon Soy Sauce
2 teaspoon sugar
Few handfuls Baby spinach
Handful fresh green beans – sliced in half
3 tomatoes – diced
2 shallots – sliced
½ cucumber – quartered then sliced
Small handful coriander leaves – roughly chopped
1 packet rice noodles – soaked in boiling water for couple of minutes then drained
Bean sprouts (optional)
Pepper (optional)
Few chopped roasted peanuts for garnish

Method

Using a wide deep frypan,  heat a little of the oil then quickly fry off the shredded ginger garnish
Remove from pan and drain on kitchen paper.
Add a splash more oil to the pan if needed.  Heat to medium.
Fry the onion until golden. 
Then add the ginger, garlic, capsicum, kaffir lime leaves and turmeric.
Stir in the tomato paste and chilli and cook out.
Add the chicken mince and use the spatula to break up any thick chunks.
Keep stirring until chicken is almost cooked.
Drizzle in the fish and soy sauce and sugar and combine well.
Stir through the celery and green beans.
Then add the shallots and baby spinach leaves. Mix well to combine and wilt.
Drain the noodles and toss through.
Remove from heat
Stir in the coriander, diced tomatoes, cucumber chunks and Bean Sprouts
Taste and add pepper and splash more soy if needed
Serve garnished with the fried shredded ginger and/or peanuts.  
PS tastes delish even without the garnishes.
                                 Enjoy!  Colleen


Wednesday 26 October 2016

No Churn Vanilla Ice Cream


This recipe was given to me by my neighbour at Uki, It is a great starting ice cream base to add whatever your favourite flavours are.  Justine has her own chickens, so her eggs were extra special. If you don't own chickens, source the best and freshest organic eggs.


Ingredients

6 egg yolks
175 gm caster sugar (if not wanting too sweet only use 150g)
600 ml single cream
2 Tablespoon rose water
150 gm ground pistachios or scraped vanilla bean pod 

Method

Cream the egg yolks and sugar together in a mixer until smooth, thick and pale. Transfer to large stainless steel bowl. 
Pour the cream into a small saucepan and bring to the boil over a medium heat. Gradually pour the hot cream over the egg mixture, beating continually. 

Place the bowl over a pot of simmering water (making sure the base of the bowl does not touch the water) and stir with a wooden spoon until the mixture thickens to a custard. 

Add the rose water (or not if you don't have any) and fold through pistachios or vanilla bean seeds.
All the mixture to cool, then pour it into a serving bowl, cover with cling film and freeze overnight. 

Serve straight from the bowl.

I added a spoon of my Davidson Plum Jam on top to serve.

So good.

Mamma Marmalade

Tuesday 18 October 2016

Chicken and Thai Basil Stir Fry

An easy chicken dish with great Asian flavours that may not be authentically Thai but is quick to cook and a tasty dinner winner!  I was gifted a big bag of peppery Rocket leaves, had some left over after making salads and wondered how they would work in this stirfry. The result was gobbled up and bowls left clean – an clear indication that the combination was spot on! There are lots of veggies incorporated into this recipe (typical of my dinners!) so feel free to mix it up a bit and add a few options of your own.  Zucchini chunks would work well, just add early to give sufficient cooking time.  Fresh crunchy green beans would be delicious too.  I just love adding the good green stuff!  Be sure to have everything ready to add to the pan as once you start cooking – it won’t be long until dinner is ready!  Enjoy!
Chicken and Thair Basil Stir Fry by Feed Your Inner Cook
Preparation      10 minutes
Cooking           10 – 15 minutes
Serves              4

Ingredients

500 gram Chicken Thigh fillets – remove fat chunks, slice into strips
1 tablespoon Cornflour
Splash Rice Bran Oil   or  Peanut oil
2 onions – finely sliced
2 cloves garlic – crushed
½ teaspoon dried red chilli  Or   use sliced red chilli
2 shallots – cut into 1 inch batons
½ red capsicum, sliced
2 large handfuls Rocket   OR   baby spinach
2 handfuls Thai Basil leaves
200 gram packet Asian noodles (cooked in boiling water for couple minutes, then drained)
1 tablespoon Oyster Sauce
1 teaspoon Fish Sauce
1 teaspoon Soy Sauce
1 tablespoon Dry Sherry  (pop the sauces and sherry in a cup ready to add in one go)
½ teaspoon Sesame Oil (no more – very intense flavour)
Handful Fresh Bean Sprouts
Salt and pepper to taste
Handful Cashews
½ cucumber – sliced on diagonal into chunks
Few snow peas – shredded (optional)
Mint leaves – shredded (optional)

Method
Toss the chicken slices with the cornflour in a bowl and set aside.
Heat a wok or large frypan until quite hot.
It is important to have everything ready, cook quickly and don’t allow to stew – keep stirring.

Add the oil to coat the pan
Quickly add the chicken slices and toss/stir constantly until almost cooked. Remove from pan and set aside in a warm place.
Add the onion slices and stir until beginning to soften
Quickly toss in the garlic, chilli and capsicum
Stir in the rocket or baby spinach and the shallots
Add the sauces and sherry
Return the chicken pieces to the pan, toss to reheat
Add the drained noodles and toss through
Remove pan from heat
Taste. Season if needed, maybe just pepper.
Stir through the Thai Basil leaves, Bean Sprouts and cucumber chunks
Dot in a few drops of Sesame Oil
Finally toss in the cashews
Garnish with the snowpeas and mint leaves
                                   Enjoy!  Colleen


Wednesday 12 October 2016

Modern Sweet and Sour Pork

This Donna Hay interpretation of the classic Sweet and Sour Pork is a winner, a few more steps but it elevates the dish to new heights of flavour.  Interesting how useful pickled onions can be, both in this dish and I also use for onion rings.


Ingredients

2 cups of shaoxing (Chinese cooking wine)
2 cups of unsweetened pineapple juice
4 cm piece of ginger, sliced thinly
4 cloves of garlic crushed
1.5 kg pork belly (Preferably Australian)
440 g pickled white onions
Dried Pineapple to serve (I never had any on hand and still tasted delicious)

Sweet and Sour Sauce
3 green shallots, trimmed and halved
3 cloves of garlic, crushed
4 cm piece of ginger, sliced thinly
3 cups of unsweetened pineapple juice
1 cup white caster sugar
1 tablespoon soy sauce
1 tablespoon black vinegar (I used cider)
1/3 cup shaoxing
2 teaspoons tomato paste

Method

Preheat oven to 200 degrees Celsius.
Combine shaoxing, pineapple juice, ginger and garlic in a deep sided roasting dish.
Add pork skin side up and cover with aluminium foil and roast for 2 hours or until the pork is tender.
Line an oven tray with non stick baking paper.
Take pork from dish, discard cooking liquid and place skin side down on oven tray. Cover with another sheet of non stick baking paper.  Weigh down the pork by placing 3 cans of food or a heavy saucepan on top and refrigerate for 1 hour or until cold.

Now make the sweet and sour sauce.
Place the sliced pickled onions (I used about half the jar), garlic, ginger, pineapple juice, sugar, soy sauce, vinegar, shaoxing and tomato paste in a large saucepan over high heat.
Stir to dissolve the sugar and once to the boil, reduce to a simmer.
Simmer for 20-25 minutes or until syrupy.
Strain and set aside.

Heat a heavy based frying pan.
Slice the pork belly into 6 pieces.
Cook skin side down for 4 - 6 minutes or until golden and crisp.
Place on the side and cook until warmed through, repeat on other side.
Cook for 10 minutes until all is golden and warmed through.

Add the pickled onions to the sauce.

Drizzle the amazing sauce over the sliced pork, and garnish with slices of dried pineapple (if using).

Taste Sensation!

Mamma Marmalade.


Wednesday 5 October 2016

Quinoa Crusted Salmon with Avocado Coleslaw


Sometimes, the day has disappeared. It is almost dinner time and you find yourself in the shops wondering what to cook that is nutritious, fast and tasty.  Here is one of those "Faster than Takeaway" recipes where you grab some fresh salmon, a couple of bags of precut veggies and add to your pantry staples - and you are sorted.  I know those packaged bags are not as ideal as cutting up fresh veggies yourself, but just occasionally they make a good alternative to the temptation of greasy takeaway. Pricewise, it is comparable to many takeaway family sized dinners.  Plus, leftovers are great for lunch the next day. Enjoy!
Quinoa Crusted Salmon with Avocado Coleslaw by Feed Your Inner Cook
Preparation       10 minutes
Cooking            10 minutes
Serves               4

Ingredients
2 pieces salmon fillet – skinless  (approx. 100 -120 gram each)
½ - 1 cup quinoa flakes  (start with ½ and add more as needed)
Sesame seeds – white and black (approx. 3 teaspoons of each)
Salt (just a tiny pinch) and Pepper
1 egg - lightly whisked

1 packet raw coleslaw pre-cut vegetables
Handful mixed seed and pinenut mix (incl Pepitas, sunflower seeds)
Few almonds, unsalted, skin on.
1 packet baby spinach leaves
Splash of Oil – I like to use Avocado Oil  or alternatively use Extra Virgin Olive Oil
Leftover roasted sweet potato cubed (I often cook extra roast veggies during the week and save it in fridge for this sort of recipe)
1 ripe tomato – diced
1 avocado – sliced
1 tablespoon Pesto
½ lemon
Salt and Pepper to taste if needed
Few mint leaves - torn

Method
Whisk an egg in a bowl.
Using a plate, mix the quinoa flakes, sesame seeds and a little salt and pepper.
Heat a dry frypan and lightly toast the almond, seed and pinenut mix.  Remove and save for garnish.
Heat a splash of oil in the frypan.
Heat oven to approx. 140 ˚C
Slice the salmon into small “logs”. If too damp, pat with some paper towel.
Quickly dip the salmon into the beaten egg.
Lightly roll the salmon in the quinoa/sesame seed mixture.
Place the salmon pieces in the pan and turn until crisp on all sides.  Remove to an oven tray.
Keep warm in the oven but do not burn.  Will only need to keep warm about 10 min max.
Add the roasted sweet potato cubes to the pan and warm through.
Add the baby spinach and stir until just begins to wilt
Stir in the coleslaw and remove from heat.  You just want to take the chill off essentially.
Mix the pesto through the veggie mix.
Combine the seed mix, avocado, tomato, a little salt and lots of pepper through the vegetable mixture.
Place into a wide serving bowl.
Drizzle with a little Avocado Oil (or Australian Extra Virgin Olive Oil)
Arrange the salmon pieces on top and squeeze a little lemon juice over the salmon and veggies.
Scatter with the torn mint leaves.

                                                  Enjoy!   Colleen